If you're in the market for a new home i.e. having the home of your dreams built from scratch, then you've probably heard potential contractors talk about residential wood framing. Wood framing is what gives the home its shape and it's the first thing that contractors do before moving on to drywall, roofing, etc. … so what exactly is wood framing?
Introduction
In its simplest definition, wood framing is the lumber that gives a home its support and shape. However, beyond this simple definition, as someone looking to build their new home or have it remodeled, it's important to have a full and thorough understanding of the terminology. The following article will first and foremost discuss wood framing and its components. The plan is to arm you with the knowledge necessary so that when you go out to buy lumber or hire contractors to do construction on your new home, all of their jargon doesn't trip you up as easily as it may others who understand better what they're talking about. It's by no means complete, but it should provide you with the basics as to what contractors discuss when they talk about wood framing.
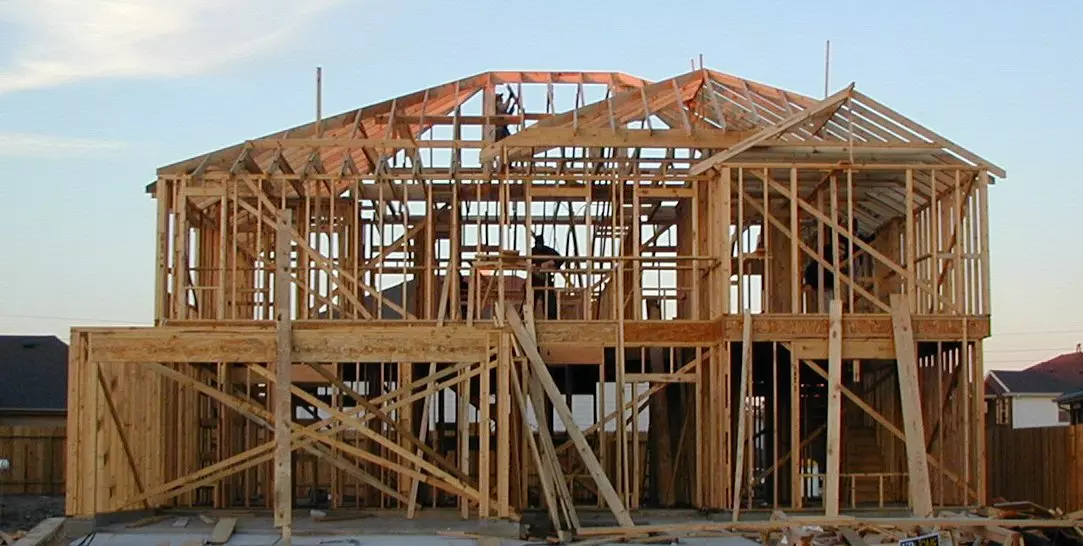
Starting from the foundation - whether brick and block walls, or poured concrete - the first framing member to understand is the part that connects the foundation to the frames themselves. Called the 'Mud Sill' this part of the wood framing is made from treated lumber and acts as the base for all the masonry work above it. Nailed at a 45-degree angle to transfer shear force from the horizontal pressure of the foundation, down through the posts, and into the concrete itself, failure to have this done correctly can result in cracking and homes quite literally sliding off their foundations entirely.
Once this sill plate has been installed and the drywall is up, the next step of wood framing is to install the 'Bottom Plate'. This plate is nailed or screwed directly to the mud sill and serves as a base for the floor of the house. Holes in the plates allow for fastening and support of plumbing and electrical wiring, as well as various access points for contractors.
Once the bottom plate has been installed, wood framers will move up to install the 'Joists'. Joists are typically made from 2x4's or 4x6's with molding on either side called a 'Flange'. Joists sit directly on top of the bottom plate and are usually 24 inches apart, though this can vary depending on the design. Joists provide direct support for the floor decking, ceiling, as well as any interior or exterior walls that may also be framed in. They also sometimes contain precut sections for ducting, wires, and other utilities.
Next, we move on to 'Beams'. Beams are long pieces of lumber that act as supports for Joists. Beams come in a variety of types and materials, each best suited for different applications. According to the 'American Wood Council', common wood beam materials include:
-
Douglas Fir
-
Southern Yellow Pine
-
Western Larch
-
Hemlock
Each has their own specific properties that lend them well to certain things. For instance, Douglas Fir and Western Larch are good for interior applications where nails and screws can be used while Southern Yellow Pine is preferred for exterior applications, although in recent years laminated veneer lumber is becoming popular with wood framing contractors.
Next, we move on to 'Columns' or 'Posts' that basically support that the beams rest on. These vertical beams transfer the weight above them into a much lower position for added stability. Columns can be made from a variety of materials and in a variety of shapes. Though the most common is a square post, others include:
-
Rectangular Columns
-
Round Columns
-
Decorative Columns
It's important to note that whatever their design, beams are structural, meaning they contribute significantly to the overall strength of the structure. All three have their benefits when used for certain things according to the 'American Wood Council'. The important thing to note when speaking about wood framing is that there are no hard and fast rules when it comes to design. The only universal rule is that wood framing must be adequate to support the weight above them.
With the foundation aspects covered, it's time to move upward. In this case the 'Subfloor'. These are sheets of plywood that create a stable structure above the joists that covers the entire perimeter of the floor plan, right out to the edge of the structure, and serve as the base for everything that comes above the house foundations, starting with walls.
'Walls' in wood-framed houses are built with 'Studs' - vertical pieces of lumber that create the vertical structure of the house and their fixture to the subfloor called a 'Plate'. Most often supplied from lumber yards in the 2x4 or 2x6 form, studs are cut to the appropriate lengths and then nailed into place either center-to-center or on-center, depending on how many studs you need. Nailing is done by nailing through the flanges of the stud at an angle (for additional strength) while leaving space for insulation between them, ranging from 16" to 24" depending on the design. Adding support to the studs are smaller pieces of wood called 'Blocking' which serves a very important purpose of preventing the long pieces of vertically stacked lumber from bowing or twisting.
An important part to note here is that while studs typically run the entire length of the wall, they are often interrupted by open space for doors or windows called 'Rough Openings'. These openings need extra pieces of wood called 'Headers'. Headers are pieces of lumber, usually 2x8 or larger (for added strength), that run perpendicular to the floor joists and act as supports for door openings and other structural features. The ends of the headers are called 'Jack Studs' and are placed at the height of the door opening. These jack studs, along with the plate (which sits directly above), serve to span the distance between two adjacent floor joists and act as an anchor for the ends of both header wood planks. Rounding off the wood framing for doors and window component are 'King Studs' that frame the opening from the subfloor to the ceiling and 'Cripple Stud' just under the 'Rough Sill' that support the opening from the bottom, in the case of a window.
As we go higher, the definitions remain the same with the only thing that might change is the dimensions of the bottom supports to carry the extra weight. Lastly, we reach the roof. Wood framing for roofing is treated as a whole separate topic mainly because of the complexity involved. Wood framing needs to be done in three dimensions with supports all converging onto a single beam. In traditional wood-framed homes, roofs are made up of 'Rafters'. These are wooden pieces similar to floor joists but set at a specific pitch. At the bottom, they rest on the structure below it, and on top, they converge at a 'Ridge Board'. Depending on the design, different types of ridge boards might be used, but they all serve the same purpose i.e. to anchor the upward motion of the rafters.
In homes that follow a modern design aesthetic, however, roofs are built using 'Roof Trusses'. These trusses consist of a series of wood beams crossing and holding each other in place and are often made up of two or three smaller pieces combined. A roof truss is easier to manufacture and install than standard rafters but is often more costly. The trade-off comes with the truss's ability to sometimes not need load-bearing walls beneath them. Such is their inherent strength.
With the foundation, floor, walls, and roof done, our structure is complete. What comes next is the 'Sheathing'. Sheathing provides additional protection to the house by covering the barebones wooden frame and is the foundation for the exterior cladding of the house. The sheathing is laid horizontally and vertically, alternating every stud or rafter. The horizontal pieces are called 'T&G' (for tongue and groove) and the vertical pieces are called 'Plate Sheathing'. These sheets of wood should overlap their seams. Each piece is placed with its' outer face to the weather and its' side that has been 'T&G'd towards the inside of the house. This facing pattern allows for lower exposure to water damage and a stronger enclosure on the inside. Once this process is done, it is time to move on to the finishing touches on the interior.
Conclusion
Wood framing is a complicated process but one that allows a home to stand for generations if done correctly. To make sure your home withstands the test of time, it's important to have a skilled wood framing contractor handle the operations rather they risk your home with DIY efforts that might be cheaper in the short term, but more expensive as the years go by.
Note: Image Credit - Wikipedia